Monthly Archives: December 2011

Step aside, Susie Fishbein

That’s right – we got a new cookbook. Ok, if you aren’t a frequent kosher cook you may not have gotten that, but it’s exciting, nonetheless.

My Mother hardly ever cooks with recipes. She just knows how to throw ingredients into a pot and have them rock your world once they’ve been cooked. I’ve tried that, but the results aren’t nearly as successful – so I started buying cookbooks. I started with Quick & Kosher: From the Bride Who Knew Nothing, by Jamie Geller, but I think I ended up tweaking almost all the recipes (except for the One Bowl Amazing Chocolate Cake…stay tuned..). So I quickly moved on to Susie Fishbein’s Kosher by Design series[excluding Kosher by Design Lightens up], and even though she has soo many recipes, and she is the kosher celebrity chef – I’ve gotten bored.

So when Ari…yes, Ari, found this cookbook – we ordered it and just got it in the mail today. It’s called Fresh & Easy Kosher Cooking, by Leah Schapira. I hadn’t heard about it until two days ago, but it seems right up my alley. Don’t let the healthy looking cover fool you – a lot of the recipes are fried and look incredible.

Recipes I am excited for: 

Onion Blossoms aka Blooming Onion, Lazy Man’s Cholent, Beer Beef Stew, Teriyaki Sesame Chicken, Sweet Potato and Pastrami Pockets, Avocado Wontons, Sweet Buffalo Chicken, All the sauces (I love sauces!)…The list really goes on and on…

Recipes Ari is excited for: 

Overnight Potato Kugel, The Perfect Pizza (includes recipes for pizza dough, sauce for dipping pizza, pizza sauce, thin-crust pizza). I am 95% sure he was interested in the cookbook because of the Kugel recipe.

The ones we’ll probably skip:

Roasted Mushroom and Pepper Salad (includes both mine and Ari’s least favorite ingredients – Ari’s being mushrooms and mine being peppers), Pistachio Creamy Bow-Tie Pasta, Egg and Liver Tower, Healthy Peanut Butter Bars??I mean… reallyy??

Anyways, I will be sure to post some of these recipes in the near future (once I’ve tried them).

g night!

Li-or

Tagged , , ,

Late Night Latkes

It’s the seventh night of chanukkah, and I haven’t found the time to make latkes…until now. It was 8:30 PM when I started peeling, but it was well worth it, because Ari’s doing the dishes, and who would object to a fried latke dinner no matter what time it was? I know most people eat latkes as a side dish, or grab a few at an annual chanukkah party…but I don’t care much for balanced meals, and if there are enough latkes to fill me up – why the hell not??

Needless to say, latkes are one of the most traditional chanukkah foods, and one of the best chanukkah foods (if made correctly). I was never in charge of making latkes growing up, but once I was married, it was fun to experiment, and no one was telling me not to eat as many latkes as I wanted for dinner. I think our first chanukkah together we had latkes for/with our dinner 8 nights in a row. Well, we’re passed that, but it wouldn’t be channukah without some good ol’ traditional latkes – so here’s my recipe.

Ingredients

  • 6 Medium red potatoes, peeled and cut the long way twice (a lot of recipes call for Yukon gold or russet potatoes, but I use red potatoes for everything.. because they’re a lot better)
  • 6 Eggs
  • 3 Small onions, halved
  • 4 Tbs flour
  • Salt
  • Pepper
  • Canola oil

Directions

  1. If you have a food processor, use the shredder attachment and shred the potatoes and onions together. If you don’t have a food processor, you’ll have to use a coarse grater and do it by hand (still well worth your time and possible cuts). If you can’t peel like a pro, place the potatoes in a bowl of cold water as you go so they don’t turn brown. Also, switch off between shredding potato and onion (so they are sort of mixed in together), because the onion also helps to keep the potatoes from browning.
  2. Transfer to a large bowl and try and squeeze out the excess water over a sink.
  3. Add the eggs, flour, salt (lots), and pepper. Mix well.
  4. In a large nonstick frying pan, heat up about 1/4 – 1/2 inch of canola oil. Add a little shred of potato to the oil – if it’s sizzling, it’s hot enough.
  5. Use your hands to make the latke shape. As you do this, squeeze out all the liquid you can [back into the bowl] – this will make your latkes crispy and delicious, unlike the ones you get at synagogue.
  6. Place the latke into the oil, and allow to fry until the edges are getting crispy and golden. 
  7. Flip with a spatula and allow to fry until both sides look the same. Be patient…latkes take a while to fry… 
  8. Transfer onto a paper toweled plate to get rid of excess oil (unless you want to go all out).
  9. Dig in.

[Goes great with apple sauce, Frank’s Red Hot Sauce, and probably sour cream (if you’re into that)]

Chag Sameach!

Li-or

Tagged , , , , ,

Sufganiyot

I know I’ve been MIA this past week, but you didn’t think I was going to get through chanukkah without sharing some recipes…did you?   If you did, you’ve obviously missed something. Channukah is a time for fried food. I look forward to this all year long. Most Jewish holidays are filled with food, but chanukkah is filled with the best food. I love everything about chanukkah.. ok, not this year’s Maccabeats video, but mostly everything about this holiday is so great.

If you’ve ever spent chanukkah in Israel, you know all about sufganiyot, or fried doughnuts. If you’ve never spent channukah in Israel, go spend chanukkah in Israel. And if you’ve never been to Israel.. go to Israel during chanukkah.

Nothing really compares to Israeli sufganiyot. I’m not sure what it is, but every doughnut is perfectly shaped and fried and extremely delicious. I think while I was in Israel I must have eaten at least one a day for the entire month before chanukkah. So in light of chanukkah (pun intended), here is the best recipe I have found for sufganiyot. They’re not quite as good as the Israeli version, but they may give you an idea as to what I am talking(/dreaming) about.

Ingredients

  • 2 Cups flour, plus more
  • 1/4 Cup sugar
  • 1 Packet or 2.25 tsp active dry yeast
  • 1/2 tsp salt
  • 2 Large egg yolks
  • 3/4 Cup of warm milk or soy milk
  • 2 Tbs butter or margarine at room temp
  • 6 Cups canola oil, plus more
  • Jelly
  • Confectioner’s sugar

Directions

  1. In a stand up mixer, mix the first four ingredients.
  2. Add the yolks and milk and mix with the hook attachment on medium-low speed.
  3. Add the butter/margarine and mix on medium-high speed for about 5 minutes, until the dough is shiny and elastic.
  4. Grease a large bowl with oil, and transfer the dough into the bowl (use flour to help get the dough off the edges..it’s supposed to be sticky).
  5. Cover bowl with saran wrap, and allow to rise for 1-1.5 hrs (until size has doubled) in a warm room.
  6. Move dough onto a floured surface and roll until it is 1/4 inch thick. Use a two inch round cookie cutter (or a glass) to cut doughnuts out of the dough – place them on another floured surface.
  7. Cover lightly with saran wrap and allow to rise again for 30 min.
  8. In a medium pot, heat up the oil to 350° F (if you don’t have a thermometer, stick a tiny piece of dough into the oil and wait for it to start bubbling.)
  9. With a spatula (not with your hands), slowly drop 3 or 4 sufganiyot into the oil. Allow to fry for about 1 minute on each side until each side is light brown (flip gently with a spatula).
  10. Remove onto a paper toweled surface.
  11. Once cooled enough, cut a small slit in the side of the doughnut and use a tsp to spoon in some jelly.
  12. Sprinkle with confectioner’s sugar.

[I would have tried to get a better shot, but they were getting cold right in front of me..]

And if you haven’t already…Put on your yarmulke, and go listen to all of Adam Sandler’s chanukkah songs on repeat…because unlike the Maccabeats, they never get old.

Happy Chanukkah!!

Li-or

Tagged , , ,

A Bunch of Crapple…

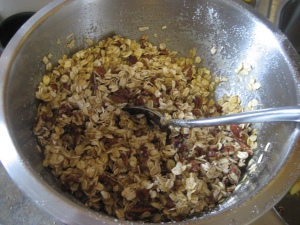
Before the cranberries go out of season, I thought I would share one of the best sides for Fall/Winter. Crapple. For those of you who didn’t go to Camp Stone, Crapple is another name for Cranberry Apple Crunch. I don’t know who made up the name [if you do, comment below and I will gladly insert their name here] but needless to say, it’s brilliant.

Camp Stone (shout-out to Mitbach ’07) is actually where I was first introduced to the whole idea of cranberry apple crunch. Coming from a Moroccan kitchen, where this recipe is definitely considered to be a dessert, I didn’t even know where to begin. When the head of the kitchen asked me to make 12 large pans of crapple and handed me a list of ingredients, I simply mixed all the ingredients together and threw them in the pan. Once everyone was done laughing at me, I quickly learned how to make and love this dish.

Since my Camp Stone days, I have been introduced to my mother-in-law’s crapple (or Cranberry Nut Crunch) and happen to enjoy it even more. Every once in a while, though, I crave the original recipe I was introduced to – So here are both…

Kim’s Cranberry Nut Crunch

Ingredients

  • 3 Cups of chopped granny smith apples with peel
  • 2 Cups of whole, raw cranberries
  • 1/4 Cup of sugar

Topping

  • 1 1/3 Cup of oatmeal
  • 1 Cup of chopped pecans
  • 3/4 Cup of sugar
  • 1 Stick of melted margarine

Directions

  1. Set the oven to 350°, and grease a 8×8 pyrex.
  2. In a large bowl, mix the first three ingredients and pour into the prepared dish. 
  3. Mix the topping ingredients and pour over the cran-apple mixture. 
  4. Bake for 1.25 hours, or until it bubbles and the top is getting hard.

For the Camp Stone version: 

Do the same to the apples and cranberries (but peel the apples), and if you don’t have fresh cranberries, take out the sugar and spread a can of whole berry cranberry sauce on top of the apples.

Topping

  • 3/4 Cup of flour
  • 3/4 Cup of oatmeal
  • 2/3 Cup of light brown sugar
  • 3/4 tsp cinnamon
  • 3/4 – 1 Stick of cold margarine

Mix the first four ingredients, add 3/4 stick of cold margarine and mix with fingers until crumbly – add more margarine if it’s too dry.

[Yum]

g-night!

Li-or

Tagged , , , , , ,

Chinese Soup

My Mother was born in Israel and is of Moroccan descent. Needless to say, this adds up to some of the best food combinations in the world. In my eyes, my Mom is the best cook (if you’ve had her food, I doubt you’d argue) – she thinks quickly on her feet, and comes up recipes that you would think took years to perfect. I know she learned so much from my Moroccan Savta (Grandmother), but she has definitely broadened her horizons and tackled foods from around the world. Below is her version of the famous ‘Hot and Sour Soup’ served in every Chinese restaurant. I don’t think Chinese people would consider it to be authentic, but it’s seriously my favorite.

Chinese Soup

Ingredients

  • 1 Package of regular mushrooms, peeled (I know most people don’t peel their mushrooms, but I do – See this video) and sliced thin.
  • 2 1/2 Tbs canola oil
  • 2 6oz can tomato paste
  • 2-3 Tbs Chicken soup mix
  • Salt
  • Boiling water
  • 4-5 Tbs Soy Sauce
  • 1/2 tsp Crushed red pepper flakes
  • Tabasco sauce
  • 3 Tbs Corn Starch
  • 1/2 Cup white vinegar
  • 4-5 Eggs, beaten (separately)
  • Green peas (optional)

Directions

  1. In a large soup pot, heat the oil and saute sliced mushrooms until very soft. Remove the mushrooms (leaving the juices in the pot) and set aside.
  2. While on medium to low heat, add 1 1/2 cans of the tomato paste to the pot. Sprinkle the chicken soup mix and a little bit of salt over the tomato paste.
  3. Add a little boiling water (enough to cover the paste) and mix well until all chunks of paste are gone.
  4. Add more water to make a relatively full pot of soup. (about 3 liters)
  5. Add soy sauce and red pepper flakes while mixing.
  6. Shake in some tabasco sauce – (the more tabasco, the more spicy…I like a lot)
  7. In a small cup, mix the corn starch and vinegar until there are no chunks. Slowly add to soup while mixing.
  8. Taste the soup – add whatever you think it is missing out of the ingredients (for me this is usually salt, tomato paste, or tabasco). (I know you don’t know the exact taste I have in mind, but do whatever tastes good)
  9. Let the soup come to a boil, and allow to boil for a few minutes.
  10. While the soup is still boiling, add each beaten egg, one by one to make egg drops. (Or all together with breaks in your pouring)
  11. Once the egg drops have formed, add some frozen peas for color.

[Photoshopped the peas in because I didn’t have any that day]

[Really great with crispy fried noodles…the ones they serve with duck sauce]

Stay warm!

Li-or

Tagged , ,

Hungry?

If you haven’t already.. it’s time to log onto Amazon, buy The Hunger Games trilogy – and read it. I know this isn’t a book blog, but I figured I could get away with it because of the title.

Buy them all together, because I guarantee you will not want to put these down once you’ve started. I just finished the third today, and am already thinking about reading them a second time.

The story takes place in the country of Panem (future North-America), where there are twelve districts, each with their own specialty. As punishment for rebelling against the government, every year, one boy and one girl (ages 12-18) from each district are chosen from a raffle to be tributes in the televised hunger games. The chosen tributes are put into an arena after a short period of training to fight to the death. Told in first person, through the eyes of Katniss Everdeen, the author leaves you and your jaw hanging at the end of each chapter, so if you have to put the book down you’ll have to do it in the middle….alright, I’ve said too much – go read!!

And once you have…

Watch the trailer:

g-night!

Li-or

Tagged

Toothpaste Brownies

Calm yourself. This recipe doesn’t actually call for toothpaste, and it definitely doesn’t promote dental hygiene. It does, however, make one of the best desserts (assuming you enjoy a chocolate and mint combination).

I don’t even remember who coined the name, but once they did – it stuck. I guess we just love the look on people’s faces when we tell them we have toothpaste brownies for dessert. So here it is, one of everyone’s favorites …

Ingredients

  • 1 Box of Duncan Hines Chewy Fudge brownies.

If you thought I made my brownies from scratch, you were definitely mistaken. I don’t know why anyone would. It’s not so much more impressive…after all, it is just throwing some basic ingredients into a bowl and mixing. If you want to try to argue that brownies made from scratch taste better, go talk to someone else. I just don’t believe it – Duncan Hines has been putting Betty Crocker, and your Grandma’s homemade brownies to shame for years.

Buttt…there are a few things that I do to make this already amazing box of brownies even better (especially for this recipe).

  • First, make sure you follow the recipe for fudgy brownies. To be honest, I am not sure why they still include the cake like brownie recipe on the box.
  • Second – add an extra splash of oil to the mix. I did this once by mistake and have been doing it ever since.
  • Third – The box says to mix 50 times. Mix until it’s super smooth – I don’t care how many times that is. Don’t leave your brownie batter grainy.
  • Finally – grease the pan with margarine, not oil or pam. I don’t know what it is, but im convinced this makes the brownies better.

[Disregard the pam in the picture, I promise you I greased it with margarine]

Mint Topping

  • 3 Cups confectioner’s sugar
  • 1 tsp Mint extract *not peppermint
  • 1 egg
  • 2-4 drops green food coloring (depends how green you want it)
  • Water

Chocolate Drizzle

  • 6 oz chocolate chips (about 12 Tbs)
  • 3 Tbs vegetable shortening
  • 1 Tbs confectioner’s sugar

Directions

  1. Make the brownies, and allow to cool completely.
  2. Mix together the first four ingredients for the mint topping, then add water little by little until you get a smooth, thick liquid mixture.
  3. Pour over cooled brownies and spread quickly to cover the entire pan. Let sit for 30 min. 
  4. Microwave chocolate drizzle ingredients for 15 seconds at a time (mixing in between), until you have a shiny, thick liquid chocolate.
  5. Drizzle over mint topping with a small spoon, and allow to set for 15-20 minutes before cutting.

[Enjoy =)]

g-night!

Li-or

Tagged , , ,

Anyway You Want it, That’s the Way You Knead it…

What is a good Jewish wife without her challah recipe? nothing I tell you… nothing.

I, for one, never liked baking challah. It’s so much easier to run to the store and pick out the softest loaf you find on the shelf. Some Jewish women feel connected to the mitzvah, and baking challah does something incredible for their soul. All it does for me is usually get me frustrated and covered in flour. But of course, homemade challah is 100 times better than store-bought, so I force myself to bake challah almost every shabbat.

When I first got married, I felt this was mandatory, and tried every recipe I could find/get from my mom. Then we went through a stage where store-bought challah was just going to have to work. And finally, I found the perfect recipe which I will probably use forever. I think I love this recipe so much because it always comes out well, and it makes so much dough that I can usually freeze raw loaves so I don’t have to make challah every shabbat.

Many of you have probably heard of this recipe or even made it – it’s the 5lb bag of flour recipe from the Kosher Palette (published by the Joseph Kushner Hebrew Academy and edited by Susie Fishbein and Sandra Blank). I know it’s Saturday night, and none of you are making challah right now (or if you are, you’re crazy), but when I took the pictures on Friday it would have been too late for you to make it anyway. So here it is…

Ingredients

  • 9 tsp active dry yeast (the real recipe calls for fresh yeast, but this works for me)
  • 4 Cups warm water
  • 1 Tbs sugar
  • 1 5lb bag of all purpose flour
  • 2 Cups sugar
  • 1 1/2 Tbs salt
  • 3 Large eggs
  • 1 1/2 Cups canola oil
  • 1 Egg

Directions (from memory)

  1. Set your oven to 300° F.
  2. In a medium bowl, mix the yeast, water and sugar. Open the over door and place the bowl on the open oven door. The yeast should begin to bubble/foam/do something. If it doesn’t – your yeast is bad. Go back to the store and get new yeast or your challahs won’t rise.
  3. In a huge bowl (I actually use a huge soup pot), pour the flour in, then take out two cups of flour and set aside. Add sugar and salt to flour and mix. Make a ‘well’ with the flour in the bowl. (push the flour up the sides of the bowl so there is sort of a hole in the middle)
  4. Add the yeast mixture, the 3 eggs, and the canola oil.
  5. The real recipe says to mix with a wooden spoon until it’s too hard, but nothing about mixing challah dough is particularly easy – so make sure your hands and arms are washed well and just go for it.
  6. Mix until the dough forms, and is no longer sticking to the sides (you may need to add from the flour you set aside little by little). At this point, most challah recipes say to knead for 10 minutes – they must be joking though.. right?
  7. Brush with oil, cover with saran wrap and a towel, and let rise in a warm room for 1 1/2-2 hrs or until the size of the dough has doubled.
  8. Once the dough has risen, do hafrashat challah.
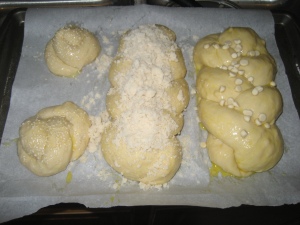
  9. Now shape your dough in whichever way you to like to. 3 strands is always easiest for me, but if you want to tackle the six strand, by all means. This recipe makes a whole bunch of loaves – bake what you need and freeze unbaked loaves (wrapped 3 times in saran wrap, and 3 times in foil). 
  10. Let rise for another 45 min – 1 hour.
  11. Set the oven to 350° F. Beat the last egg and brush the challahs lightly. Then add sesame seeds, poppy seeds or streusel topping and bake for 25-35 minutes. 

An NCSY advisor friend of mine once put parve white chocolate chips into this recipe. It is absolutely heavenly. I normally don’t love white chocolate, but the parve ones are mostly sugar and melt into delicious sugary spots throughout the loaf. I suggest everyone do this.. at least once…so when you do, just mush a bunch of white chocolate chips into the dough as you’re shaping it.

Streusel Topping

  • 1 Cup flour
  • 1 Cup sugar
  • 8 Tbs canola oil

– Mix ingredients and sugar-coat your challah. This amount is probably enough if you were making the entire dough.

 Don’t count your calories, or you’ll just hate yourself forever. 

Shavuah tov!

Li-or

Tagged , , ,

The Recipe That Won Over My Husband

I have to admit.. even though I love to cook, I don’t love to cook during the week. I see shabbat as my time to shine in the kitchen. Friday morning, I dive in head first, make a huge mess, come out with a huge meal, and have to clean it all up – it’s all worth it the second shabbat hits and I know the weekend will be filled with good company [for the most part] and lots of food. There will be times during the week when I really want to make or bake something, but most of the time I have a hard time coming up with ideas and forcing myself to do the dishes.

For the past two and half years, I have been doing my best to come up with good weekday dinner ideas that are both impressive in the eyes of my husband, and super easy for me. Thankfully, my husband isn’t too picky and will pretty much eat whatever is put in front of him, but after putting out main dishes with side dishes and salads (different recipes each time)… I tried something simple.

Macaroni and Cheese

…and to my surprise, that’s what did it. The first time we sat down to a macaroni and cheese dinner Ari says:

“You could make this for dinner every night and I’d be so happy.”

Is it my favorite? nope – but whatever floats his boat!

So now… whenever I can’t think of what to make, this is what I do.

Ingredients:

  • 1/2 lb. Elbows pasta (about two cups)
  • 2 Tbs Butter/Margarine
  • 2 Tbs Osem Onion Soup Mix (I suppose you can use Goodman’s if you can’t find)
  • 2 Tbs Flour
  • 2 Cups Milk
  • 1/8 tsp cayenne pepper
  • whole bunch of salt
  • some pepper
  • 3/4 Cup Shredded cheddar cheese, plus more
  • 1/4 Cup Shredded mozzarella cheese, plus more
  • Homestyle bread crumbs for sprinkling
Directions:
  1. Preheat the oven to 375° F (I always forget to do this until the very end and then I end up having to wait..)
  2. Boil elbow pasta to al dente.
  3. Throw the pasta into a colander, and allow to drain.
  4. On medium to low heat melt butter/margarine. Add onion soup mix and whisk into the butter. Add flour and whisk again. 
  5. Mix in milk and stir until mixture can coat the back of a wooden spoon. (Don’t try this at home, it just makes more dishes.. just wait until the mixture begins to thicken)
  6. Add the cayenne pepper, salt, and ground black pepper. Stir in the cheeses until melted. 
  7. Add the pasta and mix well.
  8. Pour into an 8 x 8 glass dish and sprinkle with both cheeses, some breadcrumbs, and some cayenne pepper.
  9. Bake for 30 minutes, until slightly golden on top.

[Goes great with Frank’s Red Hot Sauce]

Modified Martha Stewart recipe to be made kosher and a lot better.

g-night!

Li-or

Tagged , , ,